Create polls in email messages and review the results
It's easy to create a poll in Microsoft Outlook by including voting buttons in an email message. When recipients respond to the poll, you can either automatically tabulate the results of the vote in Outlook or export the responses to an Excel worksheet.
Add voting buttons
Create an email message or reply to or forward a message that you received.
On the Options tab, in the Tracking group, click Use Voting Buttons.
Choose one of the following:
Approve;Reject
Use when you need an authorization for an action. For example, you can send an email request to several recipients seeking their approval of a project proposal.Yes;No
Use when you need either a yes or a no. This is a good way to take a quick poll.Yes;No;Maybe
Use when you don't want to limit the choices to yes and no. This voting option offers an alternative response.Custom
Use to create your own custom voting button names. For example, you can ask your colleagues to choose among three days of the week for a recurring weekly staff meeting.
Custom voting button
- If you chose a Custom voting button, do the following:
In the Properties dialog box, under Voting and Tracking options, select the Use voting buttons check box.
Use the default button options, or delete the default options and then type the text that you want, and use semicolons to separate the button names.
Click Close.
Important: If you apply Information Rights Management (IRM) permissions (Options tab > Permission command) to a message, the recipient won’t see the voting options.
Recipients can vote in the Reading Pane or in an open message. In the Reading Pane, click the Click here to vote line in the message header and then click the option that you want. In an open message, on the Message tab, in the Respond group, click Vote, and then click the option that you want.
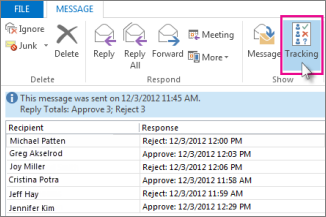
The sender can see all responses in a table. On one of the response messages, click the The sender responded line in the message header, then click View voting responses.
Review the voting responses
Open the original message with voting buttons that you sent. This message is usually located in the Sent Items folder.
On the Message tab, in the Show group, click Tracking.
Note: Tracking doesn't appear until at least one recipient of the email message has replied with his or her vote.
Track and print poll results
When you create and send an email poll to others, you may want to track and print the results. You can either quickly copy the voting results into a blank Word document or a new email, or copy them into Excel so you can work with the data later.
In Outlook, in the Sent Items folder, open the email message you sent that contains the voting poll.
Click Message > Tracking.
Tip: The Tracking button doesn’t appear until at least one vote has been cast.
To print the results of the poll, do one of the following:
For a quick print, press Alt + Print Screen (PrtScrn) on the keyboard, and then do one of the following;
In Word, click Blank document, and then click Paste.
In Outlook, click Home >New Email, and then click Paste.
Click File > Print, specify a printer, and then click Print.
To sort and work with the data results in Excel, first do this:
Click Message > Tracking.
On the keyboard, press and hold Ctrl, and then click and drag the mouse to select all names and responses in the list.
On the keyboard, press Ctrl + C.
Open Excel and choose Blank workbook.
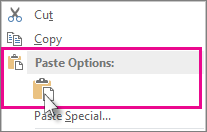
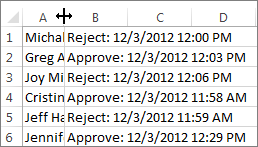
Right-click the top-left cell, and then click Paste.
To adjust the columns to fit the text, place the cursor between the column headers and double-click.
Click File > Print, specify a printer, and then click Print.