How to Create a Full Demo Course in iClicker Cloud (Do NOT Create Courses for students, EdTech will create all UME courses) This is for your own Sandbox/Demo Course to test iClicker.
Once you are added as a teacher, by EdTech, to a course as an instructor, you will receive a notification on the Bell Sign. Click on the bell and join the course.
After creating an instructor account, you must create your course either on the instructor website or in the iClicker Cloud desktop software. You'll run Polling, Quizzing, and Attendance activities from your course in the desktop software, and you can create Assignments and access course data after class on the iClicker Cloud instructor website.
Your students will use the information you supply during the course creation process to correctly identify your iClicker course and participate in your class activities in the student app. You can share your course join link or code with students, or you can set up an integration with your learning management system to easily add your students to your iClicker Cloud course. Otherwise, you will need to share your course details with students so they can manually add your course in the iClicker student app.Watch the video below or follow the steps in this article
Option 1: Create a course on the instructor website
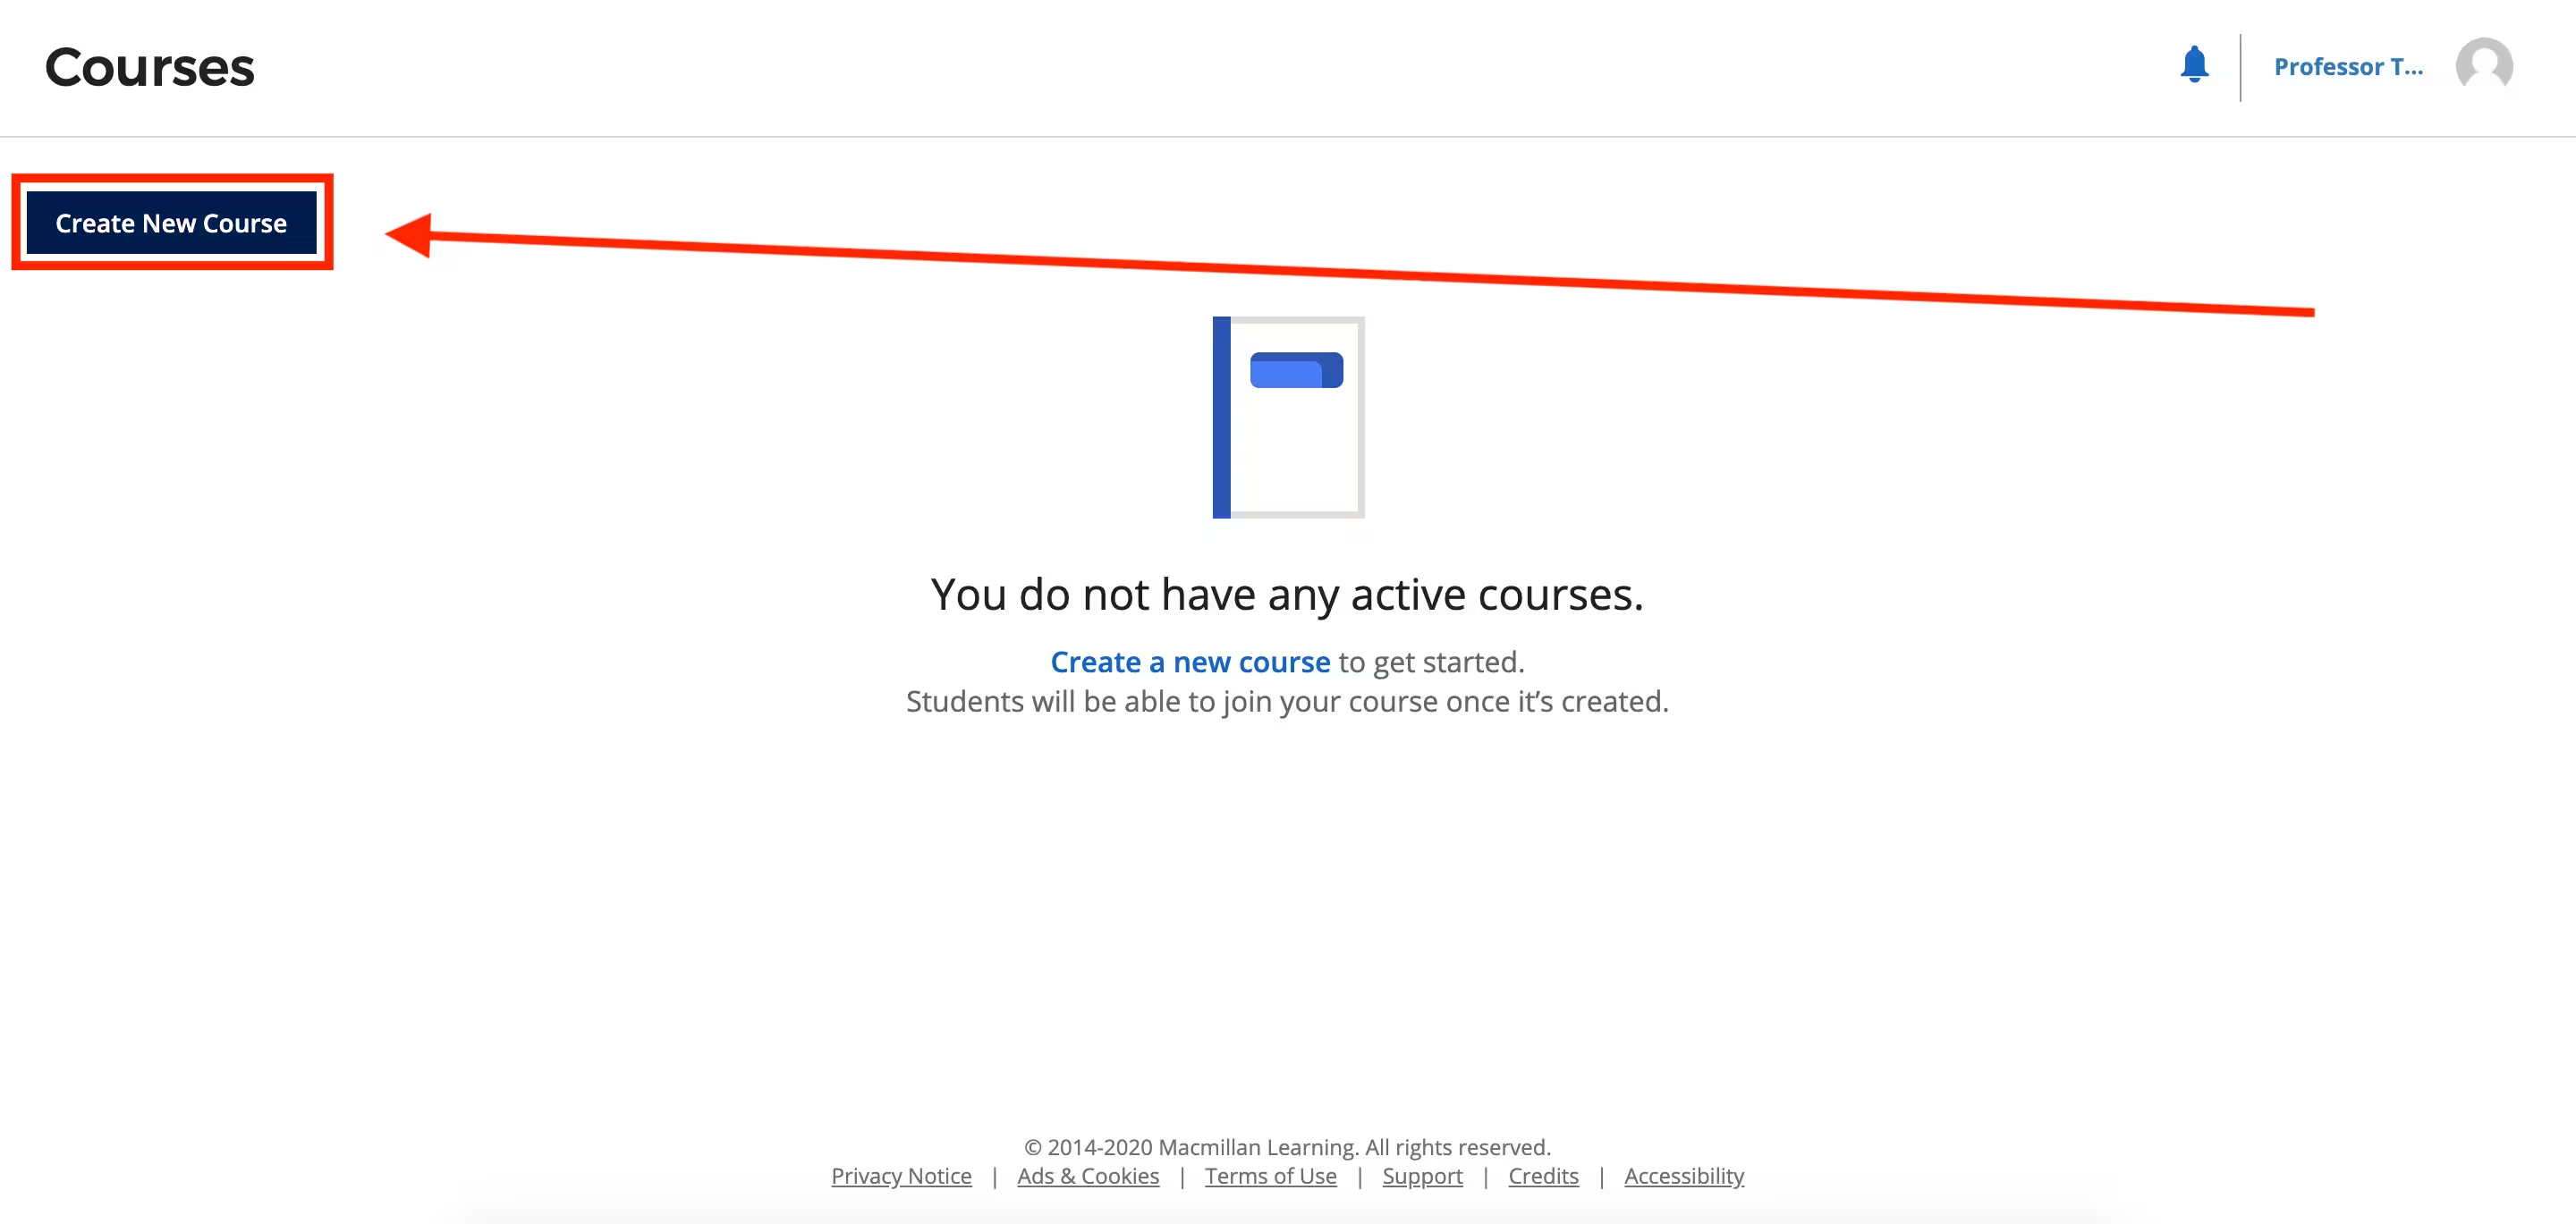
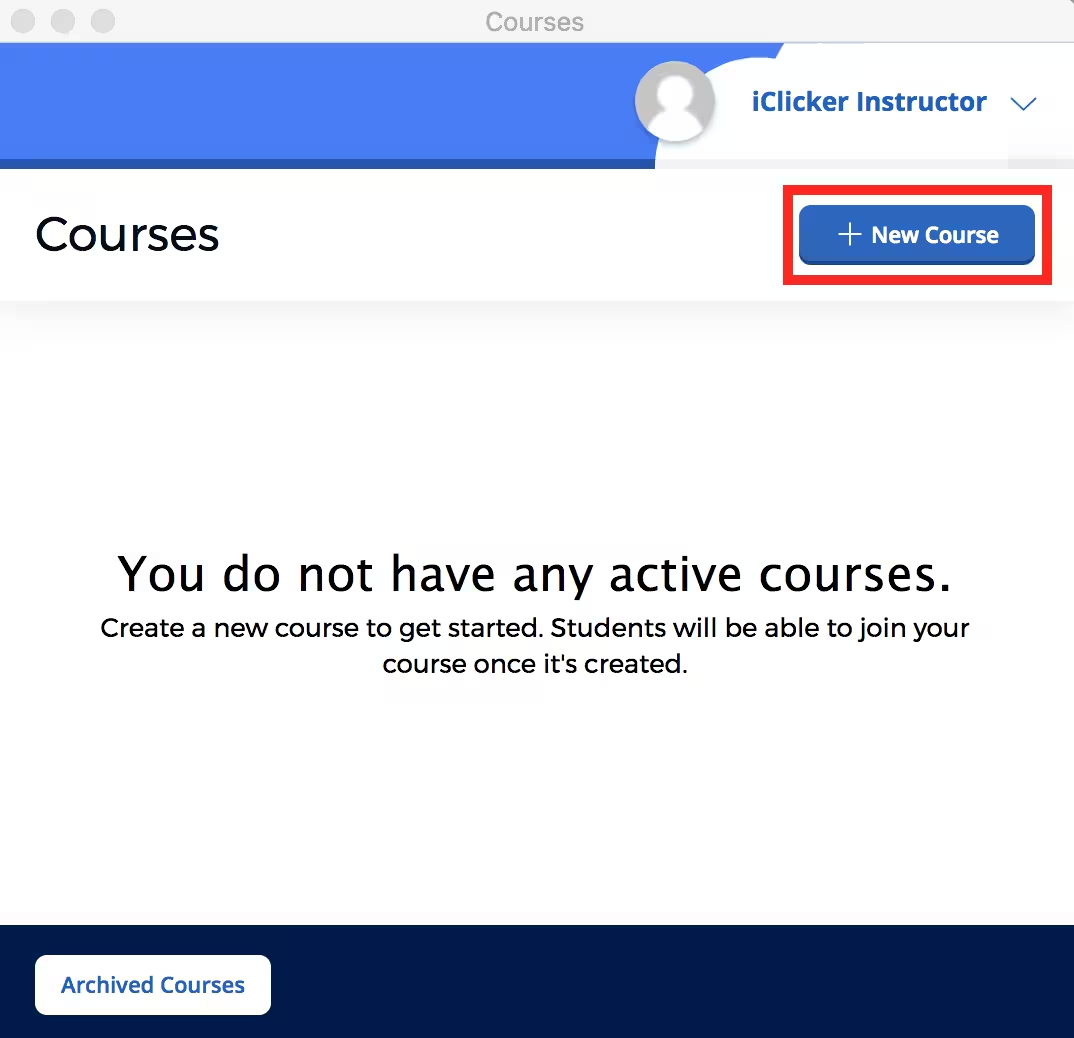
Sign in to your instructor account and click "Create New Course" in the upper-left corner
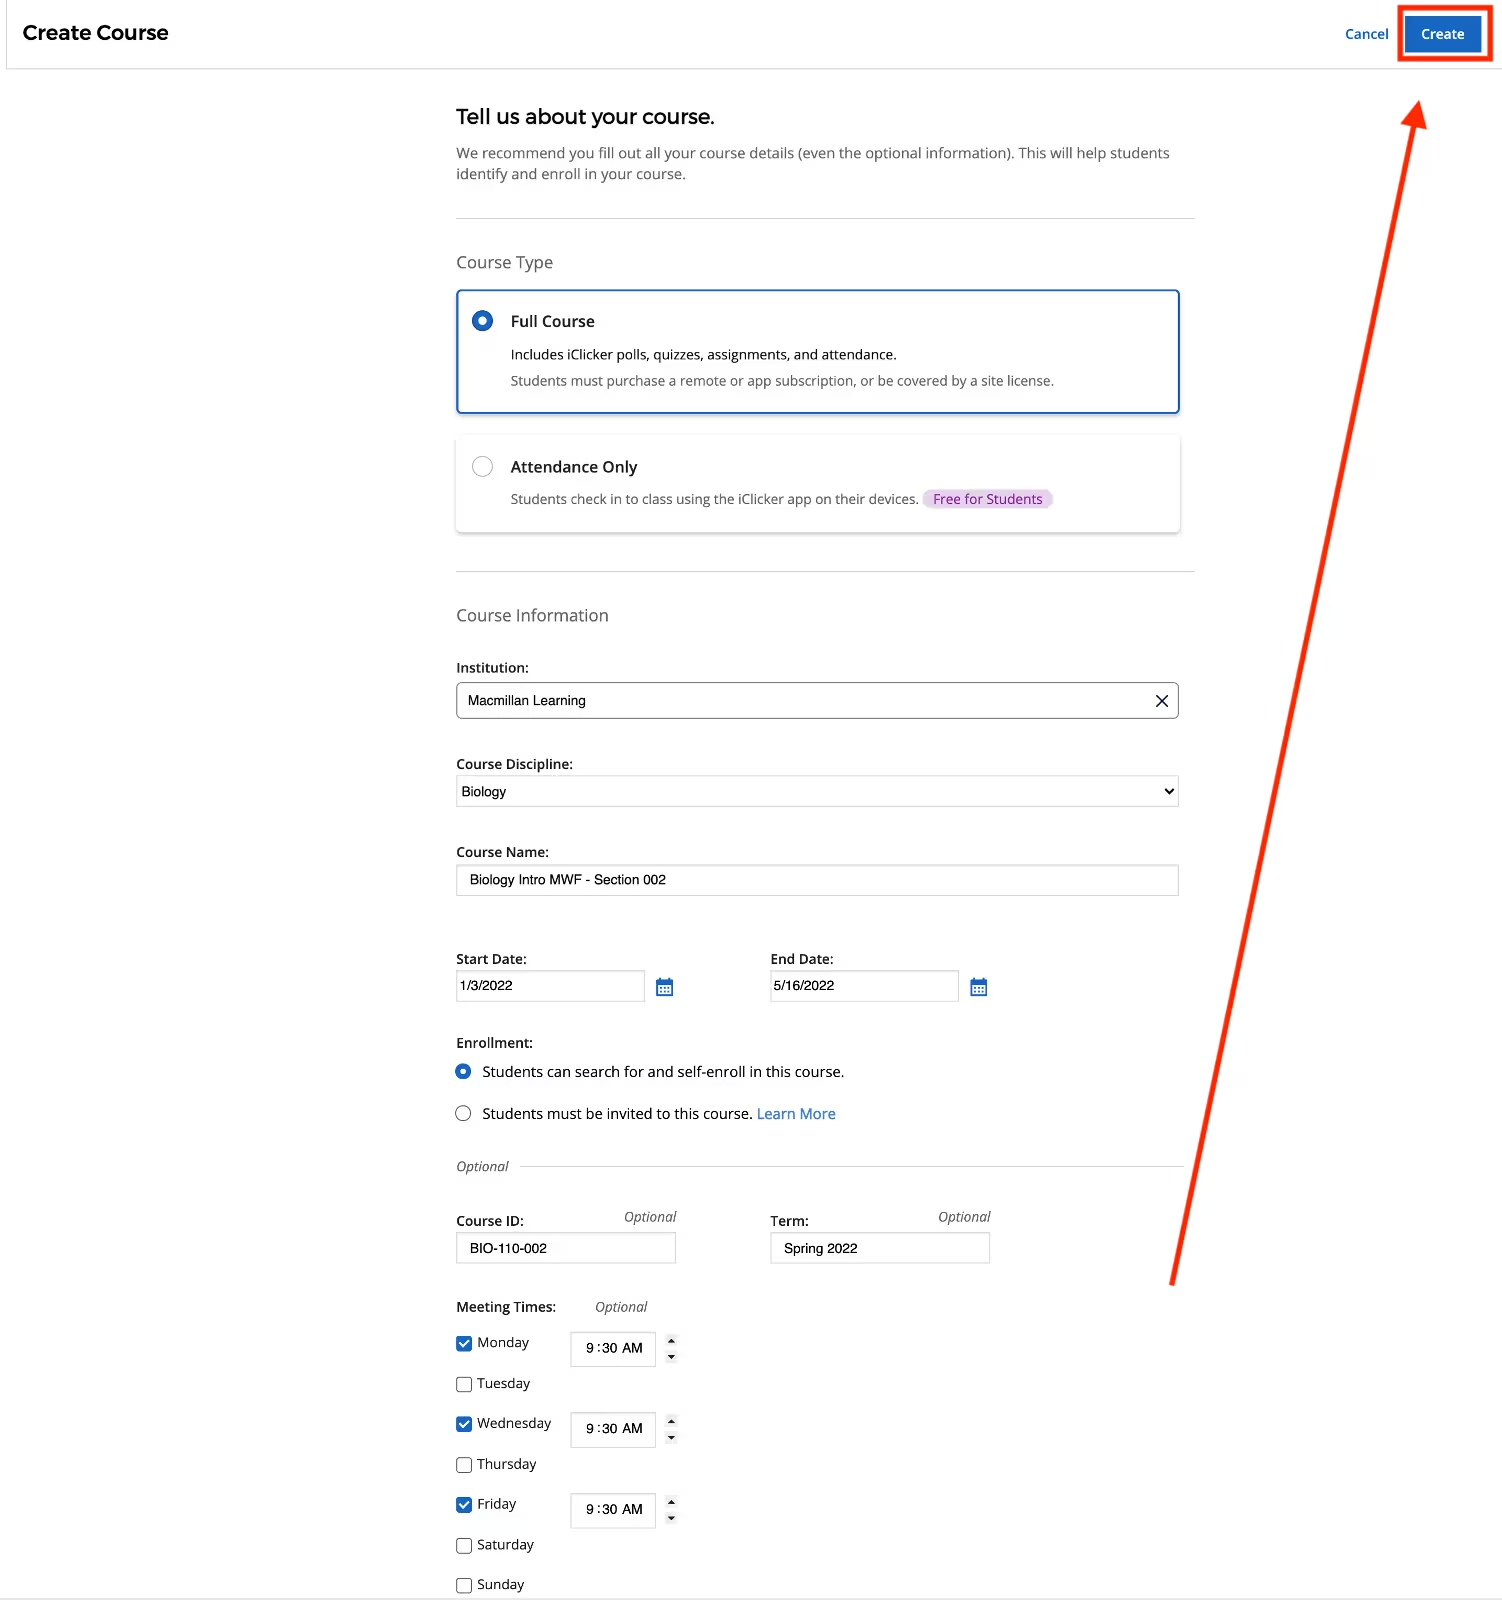
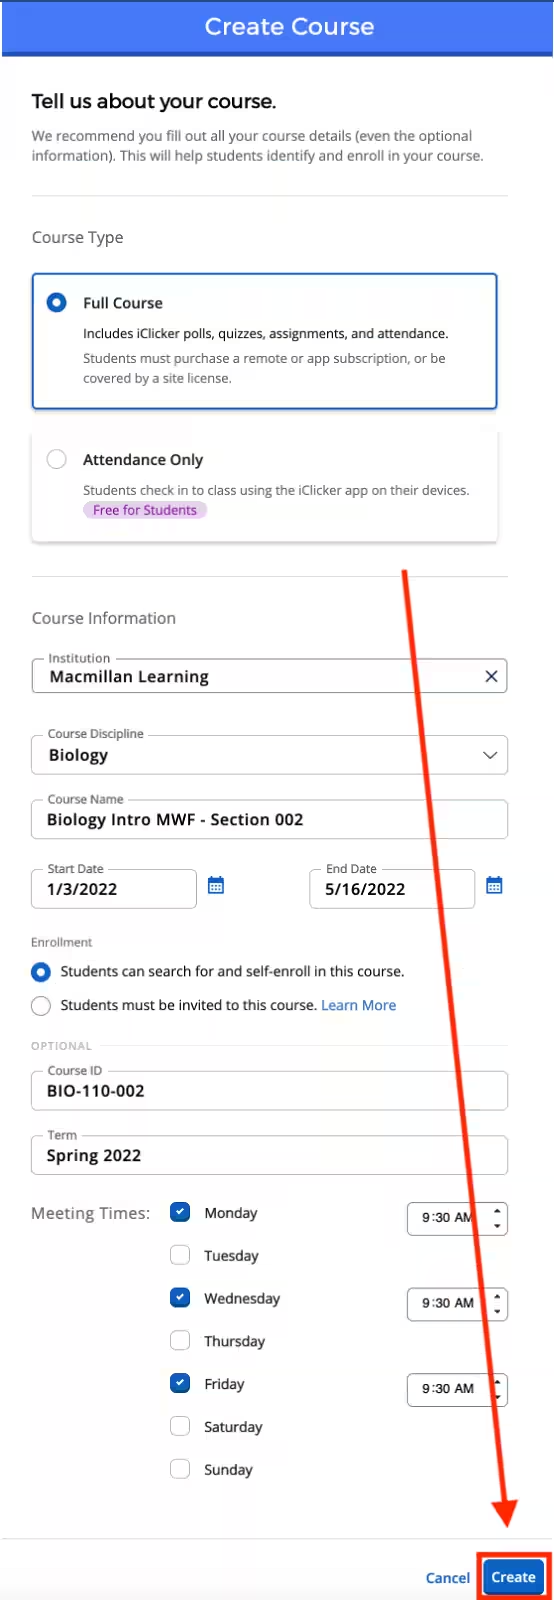
Enter course details, then click "Create"
- Select which activities you will be using in your iClicker Cloud course. Most instructors use the default Full Course option, which includes polls, quizzes, assignments, and attendance. Attendance Only courses, on the other hand, do not require use of the iClicker Cloud desktop software and can be run entirely from the iClicker Cloud instructor website.
- Your Institution and Course Discipline will be filled in based on what you entered when you created your account. You can modify these fields here as needed.
- Enter your Course Name and the Start and End Date. When your course ends (based on the End Date), it is automatically archived. An archived course no longer appears in student searches and cannot be joined. However, students who have already added the course will continue to have access to their course content as long as they do not remove themselves from the course.
- Under Enrollment, you can decide whether your course appears in search results for your institution in the iClicker student app. If you choose to make your course unlisted, students will need to enroll in your course via your course join code or an LMS integration. Learn more about unlisted courses.
- We recommend filling in the optional Course ID, Term, and Meeting Times. These additional details help assure students they’re in the right place in the iClicker student app. For example, there could be multiple sections of the same course at your institution or you might teach the same course on multiple days or at multiple times.
- Let your students know what details you have entered here—perhaps in your syllabus—so they can feel confident that they are joining the correct course.
Your new course appears on your "Courses" page
Once you create a course, the course name and details appear in the Active tab of your Courses list. You can also click the Archived tab to view any courses you have archived. Learn more about archived courses.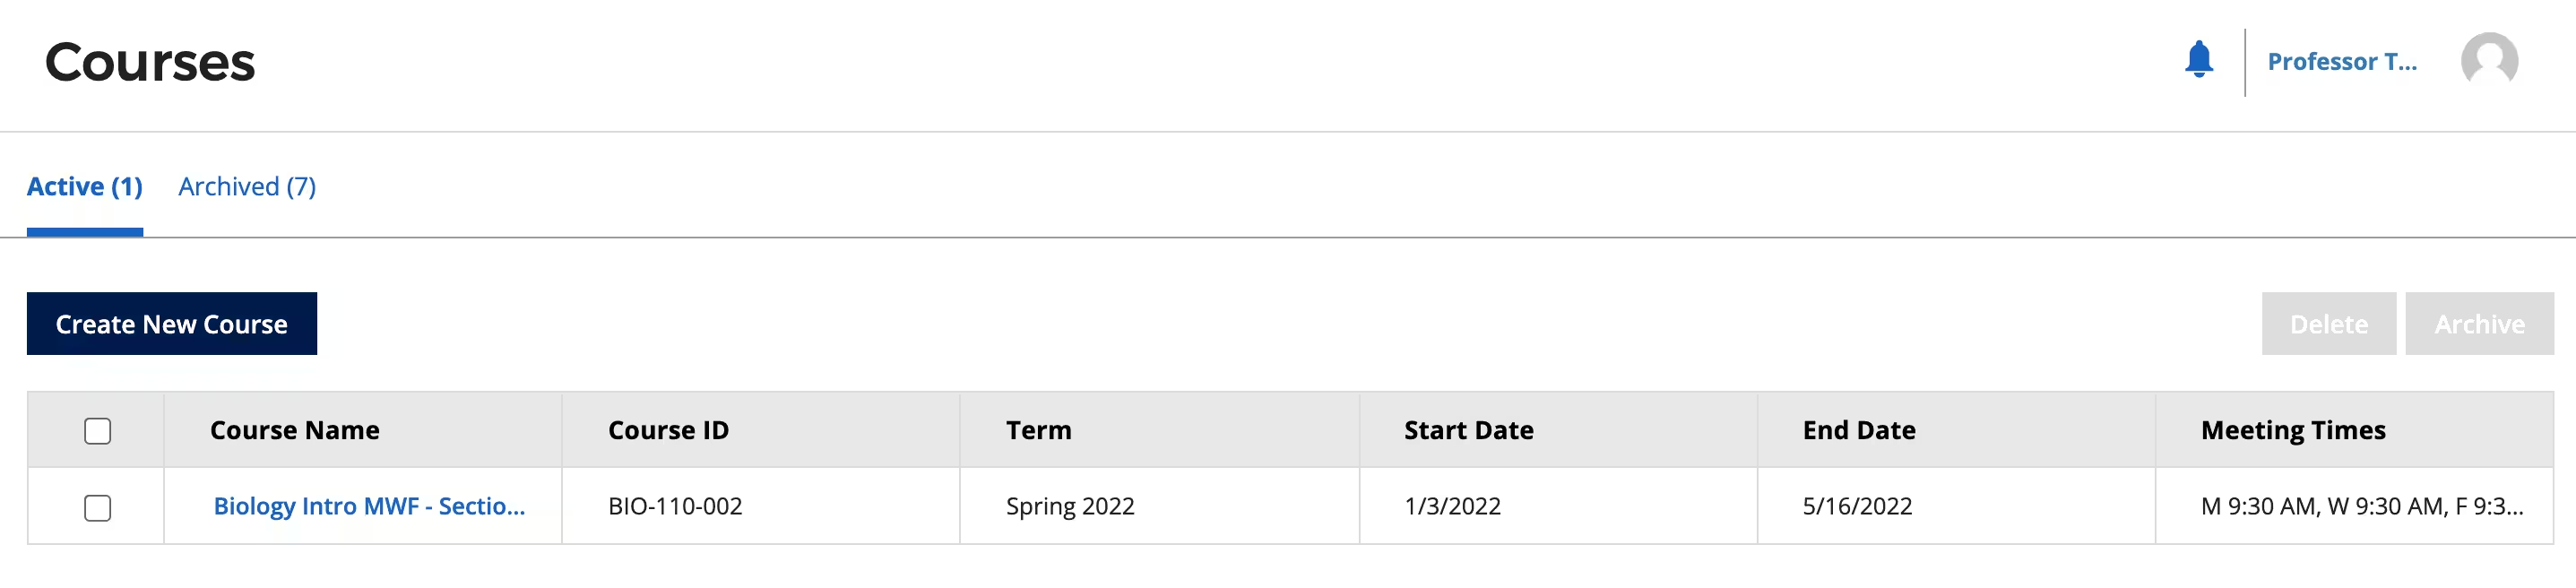
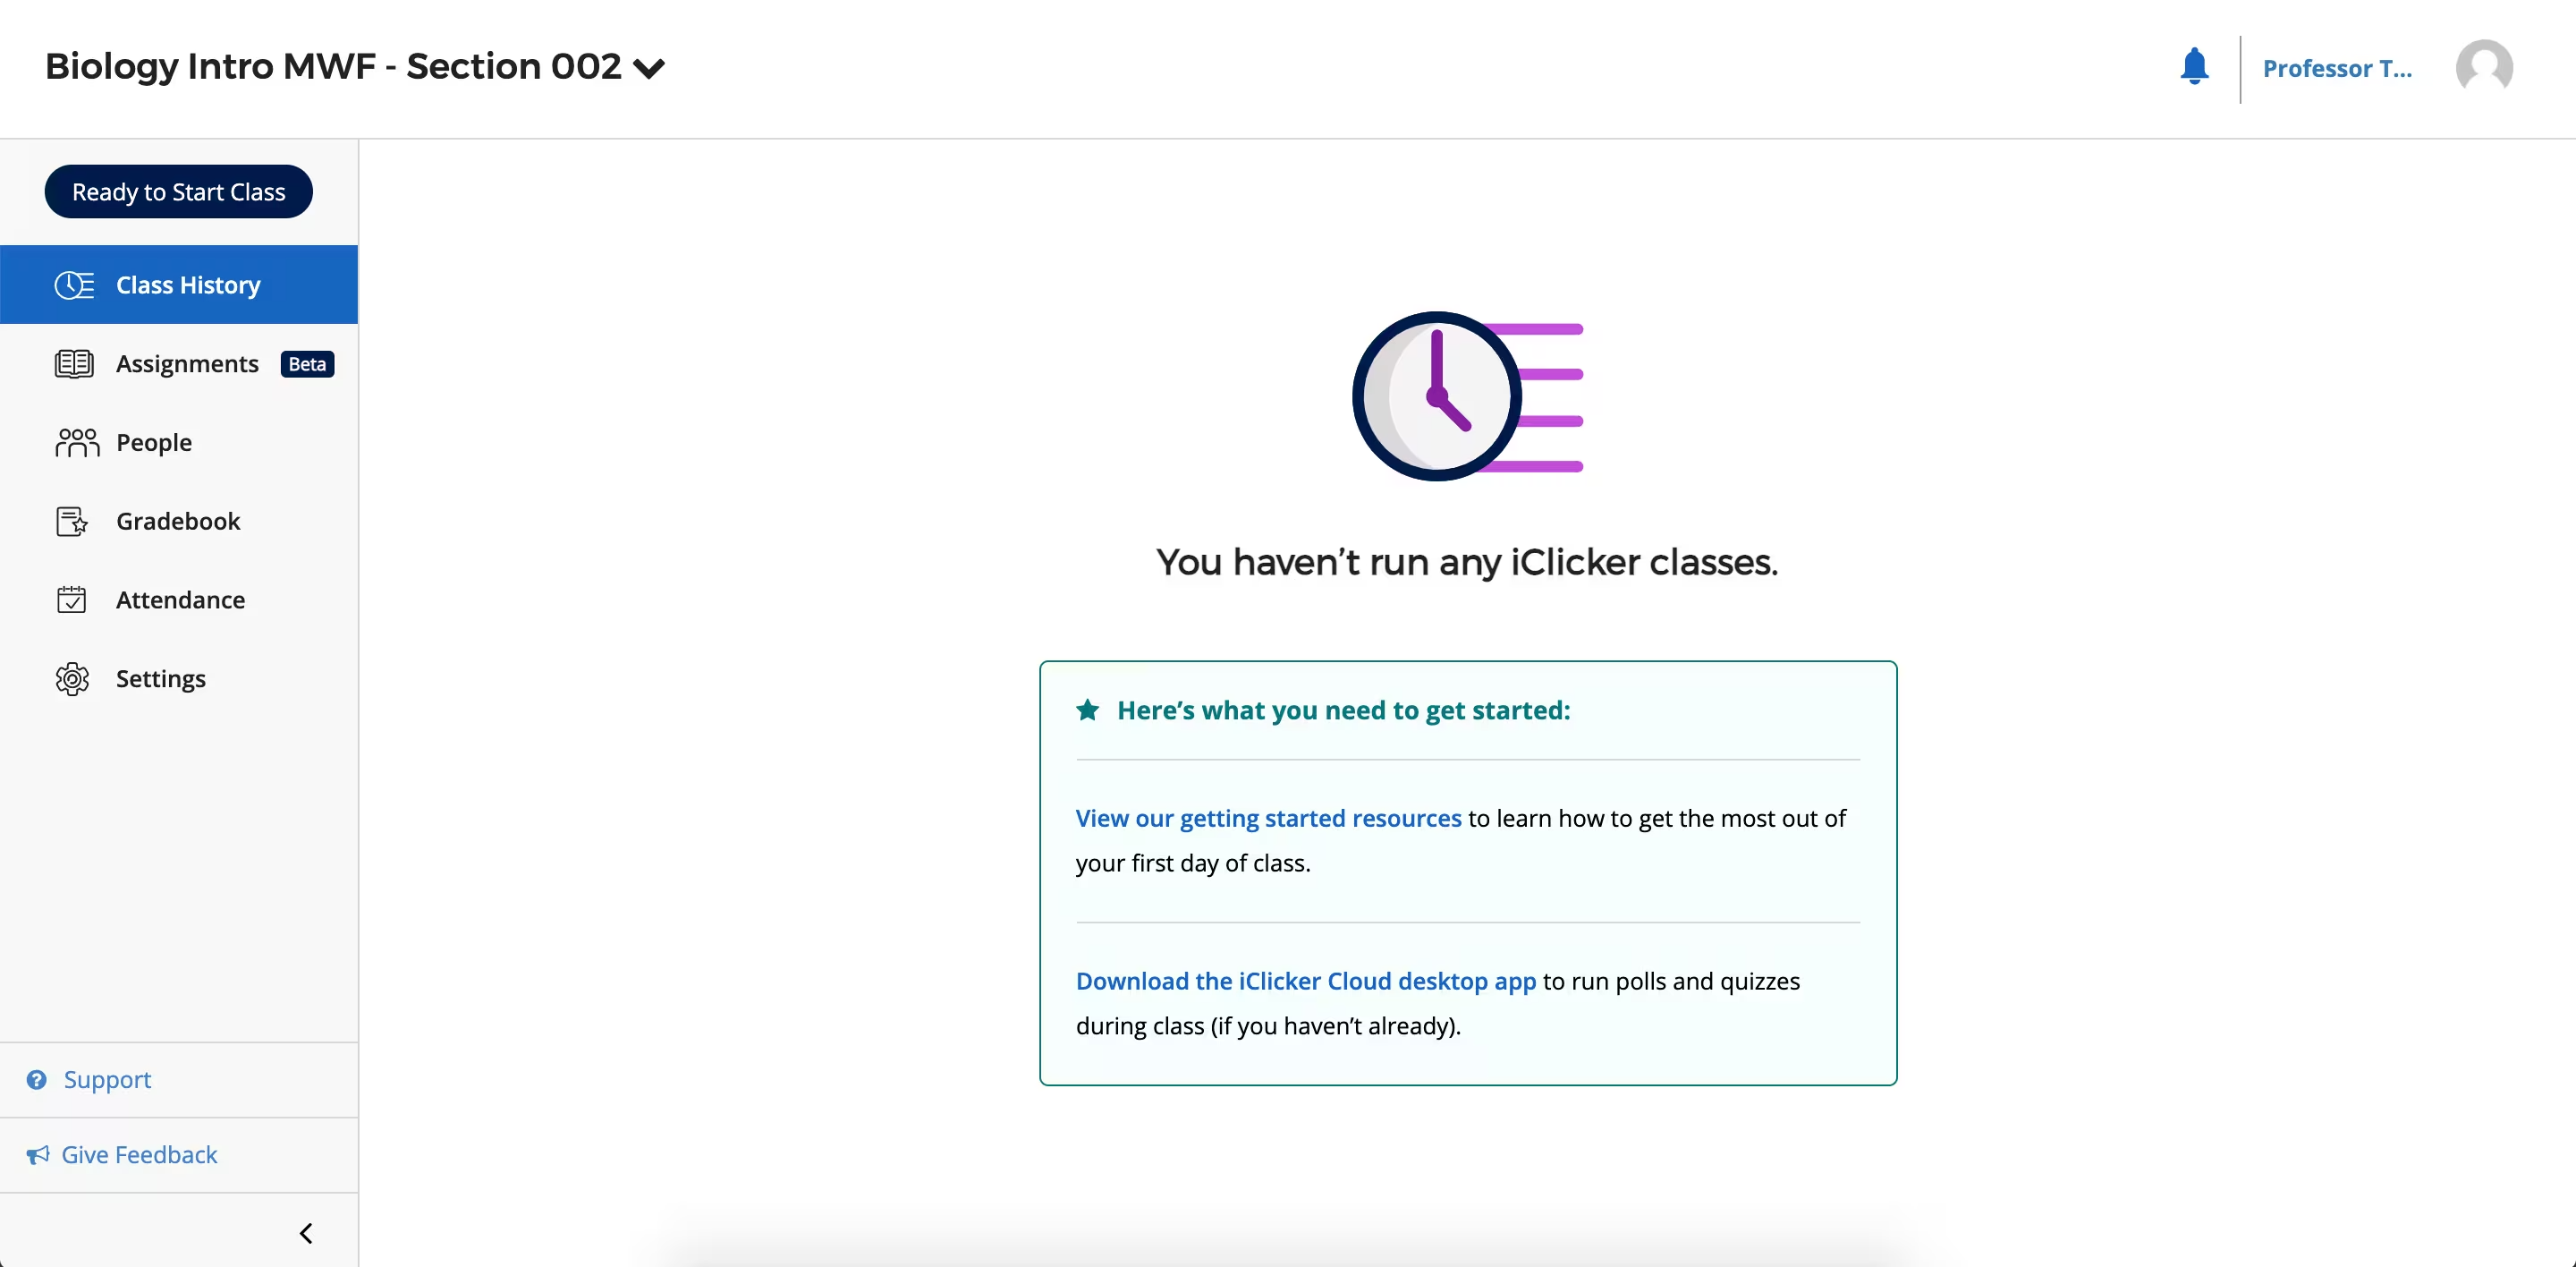
Click on the course name to access student grades and data
When you view your course for the first time, you will see you have not yet run any class sessions. You'll need to download the iClicker Cloud desktop software to run synchronous polls and quizzes in class. If you're using Assignments for synchronous or asynchronous learning, you can manage those entirely through the instructor website.
Next steps
Manage iClicker Cloud course settings
We recommend taking a little time to customize your course settings before using iClicker Cloud for in-class Polling, Quizzing, and Attendance activities. These settings are specific to each course. Learn more about managing iClicker Cloud course settings.
Optional: Share your course with your co-instructors or TAs
In the People section, you can send invitations to share your course with co-instructors or TAs. Learn more.
Optional: Create another course for running practice sessions
Before you start using iClicker Cloud in a live class, we recommend getting familiar with the software by creating a separate practice course and running sessions that are not visible to your students. As an instructor, you can log in to the iClicker student app (at no cost!) to experience class activities as both an instructor and a student. Learn more.Option 2: Create a course in the desktop software
Click "+ New Course"
Enter course details, then click "Create"
- Select which activities you will be using in your iClicker Cloud course. Most instructors use the default Full Course option, which includes polls, quizzes, assignments, and attendance. Attendance Only courses, on the other hand, do not require use of the iClicker Cloud desktop software and can be run entirely from the iClicker Cloud instructor website. However, you can still create Attendance Only courses in the desktop software.
- Your Institution and Course Discipline will be filled in based on what you entered when you created your account. You can modify these fields here as needed.
- Enter your Course Name and the Start and End Date. When your course ends (based on the End Date), it is automatically archived. An archived course no longer appears in student searches and cannot be joined. However, students who have already added the course will continue to have access to their course content as long as they do not remove themselves from the course.
- Under Enrollment, you can decide whether your course appears in search results for your institution in the iClicker student app. If you choose to make your course unlisted, students will need to enroll in your course via your course join code or an LMS integration. Learn more about unlisted courses.
- We recommend filling in the optional Course ID, Term, and Meeting Times. These additional details help assure students they’re in the right place in the iClicker student app. For example, there could be multiple sections of the same course at your institution or you might teach the same course on multiple days or at multiple times.
- Let your students know what details you have entered here—perhaps in your syllabus—so they can feel confident that they are joining the correct course.
Review your course information in your "Courses" list
Once you create a course, the course name appears in the main Courses list. Click the Archived Courses button in the lower-left corner to view any courses that have been archived. Learn more about archived courses. A Base connected icon appears in the bottom-right corner if you have an iClicker base plugged into your computer. This is required if you want to enable students to participate with iClicker remotes.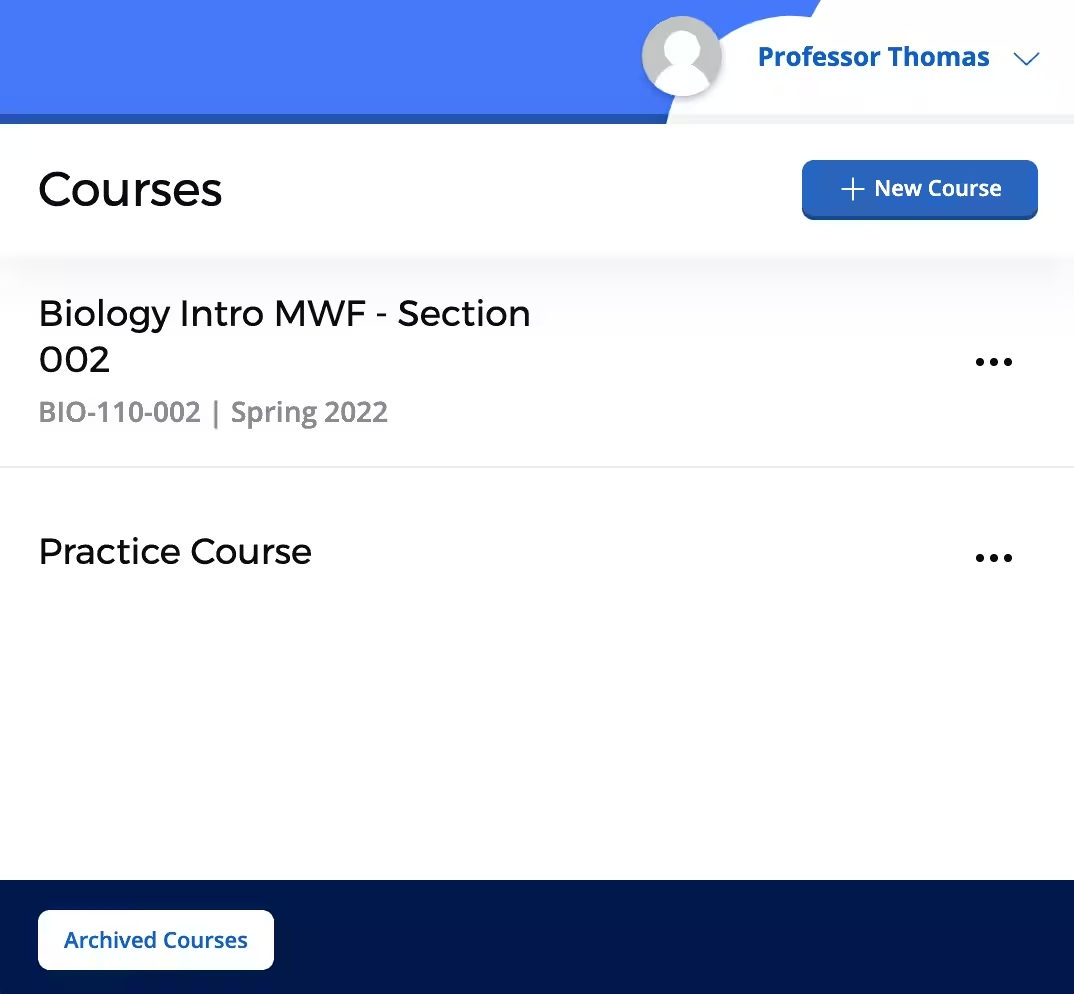
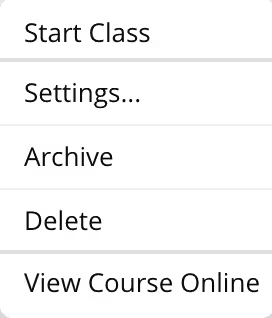
Click the ellipsis icon (...) to the right of the course name to view the menu of available course actions:- Start Class – start a new iClicker class session, from which you can manage Attendance, Polling, and Quizzing activities
- Settings... – edit course information and settings
- Archive – archive a course
- Delete – delete a course
- View Course Online – launch the instructor website to view your class history, roster, gradebook, and attendance data
Manage iClicker Cloud course settings
We recommend taking a little time to customize your course settings before using iClicker Cloud for in-class Polling, Quizzing, and Attendance activities. These settings are specific to each course.
Optional: Share your course with your co-instructors or TAs
In the People section, you can send invitations to share your course with co-instructors or TAs.