PC- After you've created your slides and recorded any timing and narrations and laser pointer gestures that you want to include, you're ready to create a video file.
- On the File menu, select Save to ensure all your recent work has been saved in PowerPoint presentation format (.pptx).
- Click File > Export > Create a Video. (Or, on the Recording tab of the ribbon, click Export to Video.)
- In the first drop-down box under the Create a Video heading, select the video quality you want. HD (720) is recommended.
Option | Resolution | For displaying on |
Ultra HD (4K) | 3840 x 2160, largest file size | Large monitors |
Full HD (1080p) | 1920 x 1080, large file size | Computer and HD screens |
HD (720p) | 1280 x 720, medium file size | Internet and DVD |
Standard (480p) | 852 x 480, smallest file size | Portable devices |
- The second drop-down box under the Create a Video heading tells whether your presentation includes narration and timings. (You may switch this setting if you like.)
o If you haven't recorded timed narration, by default the value is Don't Use Recorded Timings and Narrations.
The default time spent on each slide is 5 seconds. You can change that timing in the Seconds to spend on each slide box. To the right of the box, click the up arrow to increase the duration, or click the down arrow to decrease the duration.
o If you have recorded a timed narration, by default the value is Use Recorded Timings and Narrations.
- Click Create Video.
- In the File name box, enter a file name for the video, browse for the folder that will contain this file, and then click Save.
- In the Save as type box, choose either MPEG-4 Video.
You can track the progress of the video creation by looking at the status bar at the bottom of your screen. The video creation process can take up to several hours depending on the length of the video and the complexity of the presentation.
Tip: For a long video, you can set it up to be created overnight. That way, it’ll be ready for you the following morning.
- To play your newly-created video, go to the designated folder location, and then double-click the file.
Mac- PowerPoint 2016 for Mac doesn't support saving in a video format. Other versions of PowerPoint for macOS (2011, 2019, and the Microsoft 365 subscription) do support this feature.
Save in a video format
- Select File > Export.
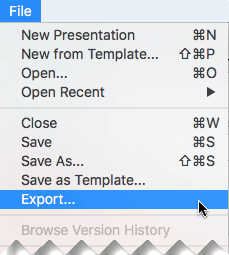
(Don't use Save As, because it doesn't offer video options.)
- Open the File Format list and select the video format that you want (MP4 or MOV).
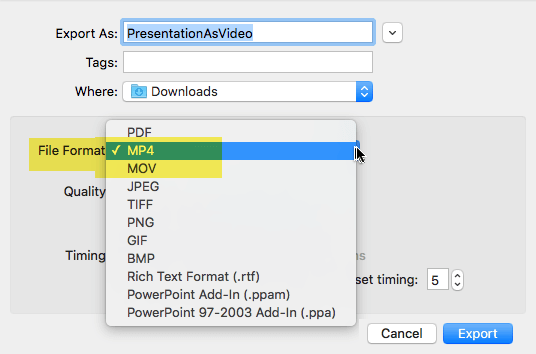
If the MP4 and MOV options aren't in your version of PowerPoint, see Requirements below for more information.
- Select the video Quality you want: Presentation Quality, Internet Quality, or Low Quality. The higher the video quality, the larger the file size.
- If you have recorded timings and want to use them in the video you create from your presentation, make sure the box next to Use Recorded Timings and Narrations is checked. You can also choose to set the amount of time the video will spend on each slide if you don't have a set timing.
- When you've made all your selections, choose Export.